
前言
FFmpeg 是一個開放原始碼的自由軟體,可以執行音訊和視訊多種格式的錄影、轉檔、串流功能,包含了libavcodec——這是一個用於多個專案中音訊和視訊的解碼器函式庫,以及libavformat——一個音訊與視訊格式轉換函式庫。 「FFmpeg」這個單詞中的「FF」指的是「Fast Forward」。
以上擷取自 Wiki 介紹
前陣子在處理影片時,以 Ruby on Rails 實作,將多個影片合併、剪輯指定時間範圍 (ex: 影片長度 00:30 ,只保留 00:05 ~ 00:15 的畫面)、上字幕、合併成一個檔案,透過 FFmpeg 來處理
後續的文章會以此 repo 作為範例
備註: 本文以此影片為例 (出處: )
如何安裝
雖然在 RubyGems 中搜尋「FFmpeg」能找到一些 Gem 使用,但這次不透過 Gem ,直接在 MacOS / Linux 環境直接安裝 FFmpeg 使用,在終端機輸入
備註: 此文以 ffmpeg version 4.3.1 版本為範例
1
2
3
4
5
6
# MacOS、Linux 原生不支援這指令
# MacOS 安裝指令
brew install ffmpeg
# note: 安裝完成後,輸入 ffmpeg -v 確認版本及是否安裝成功
如何轉檔
終端機輸入
1
2
3
4
ffmpeg -i input_video.mkv -codec copy output_video.mp4
# 範例:
ffmpeg -i DigitalCountdownTimerVidevo.mov -codec copy test.mp4
如何合併
例如想把多支影片合併,將 Milky Way Timelapse 、 Digital Countdown Timer 合併,可用以下方法,或參考 Stack Overflow 這篇
1
2
3
4
5
6
7
8
# 檔案名稱不要有空格 (檔案路徑要是正確的喔)
# list.txt
file Saint_Barthelemy.mov
file DigitalCountdownTimerVidevo.mov
# ---
ffmpeg -f concat -i list.txt -c copy output.mp4
如何剪輯指定時間範圍
需特別留意計算方式是從 mm:ss (格式為 00:04 ,4 碼) 開始,接著計算保留的「長度」,不是直接寫該影片想結束的位置喔
1
2
3
4
5
ffmpeg -ss mm:ss -to mm2:ss2 -i video.mp4 -codec copy output.mp4
# 範例
# 從該影片 00:03 秒開始,保留長度為 5 秒 (至該影片 00:08 秒位置,不能直接寫 00:08 喔)
ffmpeg -ss 00:03 -t 00:05 -i DigitalCountdownTimerVidevo.mov output.mp4
如何上字幕
字幕格式有多種,常見有 SRT、SSA、ASS、SUB、TTS、WebVTT...等,單純上字幕不加任何效果,可用 SRT,若想要調整字形、字體大小、顏色、位置...等比較進階處理的話,可考慮直接用 ASS
備註: 以 ffmpeg version 4.3.1 為例,原生不支援 WebVTT
1
2
3
4
5
6
7
8
9
10
11
12
13
14
15
16
17
# srt.srt
1
00:00:00,000 --> 00:00:05,000
Hello World
2
00:00:05,000 --> 00:00:10,000
看得到
# ---
# 將字幕嵌入影片中
ffmpeg -i DigitalCountdownTimerVidevo.mov -vf 'subtitles=srt.srt' output.mp4
# 指定字幕大小
ffmpeg -i DigitalCountdownTimerVidevo.mov -vf "subtitles=srt.srt:force_style='Fontsize=32'" output.mp4
# 備註: 針對字幕要做比較多處理的話,建議直接用 ASS 先調好,再嵌入比較方便
如何限制 CPU 使用量 (非必要)
Linux 文章系列,有提到 nice 與 cpulimit 指令,若想限制 CPU 使用量的話,可結合使用
1
2
# 說明: CPU 上限為 30% ,且使用雙核心處理 (threads 2)
nice -n 20 cpulimit -l 30 ffmpeg -threads 2 -i DigitalCountdownTimerVidevo.mov output.mp4
實際轉檔過程,htop 畫面

實作範例
上面都是在終端機操作,以下示範在 Sidekiq 上使用 FFmpeg 處理,可參考此 commit
備註:
- 該範例為先下載影片、並限制 CPU 使用量在 80%
- 若想測試,可在
rails console輸入Video::HandleVideoWorker.new.perform或先cd Video::HandleVideoWorker.new再接著輸入perform
1
2
3
4
5
6
7
8
9
10
11
12
13
14
15
16
17
18
19
20
21
22
23
24
25
26
27
28
29
30
31
32
33
34
35
36
37
38
39
40
41
42
43
44
45
46
47
48
49
50
51
52
53
54
55
56
57
58
59
60
# config/sidekiq.yml
- ['video_worker', 10]
# app/worker/video/handle_video_worker.rb
module Video
class HandleVideoWorker
include Sidekiq::Worker
sidekiq_options retry: 0, dead: true, queue: 'video_worker'
VIDEO_PATH = Rails.root.join('data/attachments/videos')
# NOTE:
# need install ffmpeg, url: https://github.com/FFmpeg/FFmpeg
# need install cpulimit, url: https://github.com/opsengine/cpulimit
def perform(url = nil)
# 以此影片為範例,出處: Videvo
url = 'https://cdn.videvo.net/videvo_files/video/free/2013-05/originalContent/DigitalCountdownTimerVidevo.mov'
video_name = parse_video_name(url)
video_file_path(video_name)
download_video(url)
converter
rescue StandardError => e
logger.error "[Video::HandleVideoWorker] ERROR:\n #{e.inspect}\n #{e.backtrace}"
end
private
def logger
FileLog.logger('worker/video/video_worker.log')
end
def parse_video_name(url)
url.split('/')[-1] # "DigitalCountdownTimerVidevo.mov"
end
def video_file_path(video_name)
@input_file = VIDEO_PATH.join(video_name)
mp4_format = video_name.split('.')[0] + '.mp4'
@output_file = VIDEO_PATH.join("converted-#{mp4_format}")
end
def download_video(url)
resp = HTTP.get(url)
save_origin_video(resp)
end
def save_origin_video(video_response)
FileUtils.mkdir_p(VIDEO_PATH)
File.write(@input_file, video_response.to_s.force_encoding('UTF-8'))
end
def converter
priority = 'nice -n 20 cpulimit -l 80' # cpulimit: 限制 CPU usage (目前上限設 80%)
ffmpeg_threads = 'ffmpeg -threads 2' # ffmpeg -threads: 設定 CPU 核心數 (目前設定 2)
`#{priority} -i #{ffmpeg_threads} -i #{@input_file} #{@output_file}`
end
end
end
指令範例 (tldr)
在 Linux 文章系列,有提到 tldr ,非常實用
1
2
3
4
5
6
7
8
9
10
11
12
13
14
15
16
17
18
19
20
21
22
23
24
25
26
27
28
29
30
31
32
tldr ffmpeg
# ---
ffmpeg
Video conversion tool.
More information: <https://ffmpeg.org>.
- Extract the sound from a video and save it as MP3:
ffmpeg -i video.mp4 -vn sound.mp3
- Convert frames from a video or GIF into individual numbered images:
ffmpeg -i video.mpg|video.gif frame_%d.png
- Combine numbered images (frame_1.jpg, frame_2.jpg, etc) into a video or GIF:
ffmpeg -i frame_%d.jpg -f image2 video.mpg|video.gif
- Quickly extract a single frame from a video at time mm:ss and save it as a 128x128 resolution image:
ffmpeg -ss mm:ss -i video.mp4 -frames 1 -s 128x128 -f image2 image.png
- Trim a video from a given start time mm:ss to an end time mm2:ss2 (omit the -to flag to trim till the end):
ffmpeg -ss mm:ss -to mm2:ss2 -i video.mp4 -codec copy output.mp4
- Convert AVI video to MP4. AAC Audio @ 128kbit, h264 Video @ CRF 23:
ffmpeg -i input_video.avi -codec:audio aac -b:audio 128k -codec:video libx264 -crf 23 output_video.mp4
- Remux MKV video to MP4 without re-encoding audio or video streams:
ffmpeg -i input_video.mkv -codec copy output_video.mp4
- Convert MP4 video to VP9 codec. For the best quality, use a CRF value (recommended range 15-35) and -b:video MUST be 0:
ffmpeg -i input_video.mp4 -codec:video libvpx-vp9 -crf 30 -b:video 0 -codec:audio libopus -vbr on -threads number_of_threads output_video.webm
更多指令
1
2
3
4
5
6
7
8
9
10
11
12
13
14
15
16
17
18
19
20
21
22
23
24
25
26
27
28
29
30
31
32
33
34
35
36
37
38
39
40
41
42
43
44
45
46
47
48
49
50
51
52
53
54
55
56
57
58
59
60
61
62
63
64
65
66
67
68
69
70
71
72
73
74
75
76
77
78
79
80
81
82
83
84
85
86
87
88
89
90
91
92
93
94
95
96
97
98
99
100
101
102
103
104
105
106
107
108
109
110
111
112
113
114
115
116
117
118
119
120
121
122
123
ffmpeg -h
ffmpeg version 4.3.1 Copyright (c) 2000-2020 the FFmpeg developers
built with Apple clang version 11.0.3 (clang-1103.0.32.62)
configuration: --prefix=/usr/local/Cellar/ffmpeg/4.3.1 --enable-shared --enable-pthreads --enable-version3 --enable-avresample --cc=clang --host-cflags= --host-ldflags= --enable-ffplay --enable-gnutls --enable-gpl --enable-libaom --enable-libbluray --enable-libdav1d --enable-libmp3lame --enable-libopus --enable-librav1e --enable-librubberband --enable-libsnappy --enable-libsrt --enable-libtesseract --enable-libtheora --enable-libvidstab --enable-libvorbis --enable-libvpx --enable-libwebp --enable-libx264 --enable-libx265 --enable-libxml2 --enable-libxvid --enable-lzma --enable-libfontconfig --enable-libfreetype --enable-frei0r --enable-libass --enable-libopencore-amrnb --enable-libopencore-amrwb --enable-libopenjpeg --enable-librtmp --enable-libspeex --enable-libsoxr --enable-videotoolbox --disable-libjack --disable-indev=jack
libavutil 56. 51.100 / 56. 51.100
libavcodec 58. 91.100 / 58. 91.100
libavformat 58. 45.100 / 58. 45.100
libavdevice 58. 10.100 / 58. 10.100
libavfilter 7. 85.100 / 7. 85.100
libavresample 4. 0. 0 / 4. 0. 0
libswscale 5. 7.100 / 5. 7.100
libswresample 3. 7.100 / 3. 7.100
libpostproc 55. 7.100 / 55. 7.100
Hyper fast Audio and Video encoder
usage: ffmpeg [options] [[infile options] -i infile]... {[outfile options] outfile}...
Getting help:
-h -- print basic options
-h long -- print more options
-h full -- print all options (including all format and codec specific options, very long)
-h type=name -- print all options for the named decoder/encoder/demuxer/muxer/filter/bsf/protocol
See man ffmpeg for detailed description of the options.
Print help / information / capabilities:
-L show license
-h topic show help
-? topic show help
-help topic show help
--help topic show help
-version show version
-buildconf show build configuration
-formats show available formats
-muxers show available muxers
-demuxers show available demuxers
-devices show available devices
-codecs show available codecs
-decoders show available decoders
-encoders show available encoders
-bsfs show available bit stream filters
-protocols show available protocols
-filters show available filters
-pix_fmts show available pixel formats
-layouts show standard channel layouts
-sample_fmts show available audio sample formats
-colors show available color names
-sources device list sources of the input device
-sinks device list sinks of the output device
-hwaccels show available HW acceleration methods
Global options (affect whole program instead of just one file):
-loglevel loglevel set logging level
-v loglevel set logging level
-report generate a report
-max_alloc bytes set maximum size of a single allocated block
-y overwrite output files
-n never overwrite output files
-ignore_unknown Ignore unknown stream types
-filter_threads number of non-complex filter threads
-filter_complex_threads number of threads for -filter_complex
-stats print progress report during encoding
-max_error_rate maximum error rate ratio of errors (0.0: no errors, 1.0: 100% errors) above which ffmpeg returns an error instead of success.
-bits_per_raw_sample number set the number of bits per raw sample
-vol volume change audio volume (256=normal)
Per-file main options:
-f fmt force format
-c codec codec name
-codec codec codec name
-pre preset preset name
-map_metadata outfile[,metadata]:infile[,metadata] set metadata information of outfile from infile
-t duration record or transcode "duration" seconds of audio/video
-to time_stop record or transcode stop time
-fs limit_size set the limit file size in bytes
-ss time_off set the start time offset
-sseof time_off set the start time offset relative to EOF
-seek_timestamp enable/disable seeking by timestamp with -ss
-timestamp time set the recording timestamp ('now' to set the current time)
-metadata string=string add metadata
-program title=string:st=number... add program with specified streams
-target type specify target file type ("vcd", "svcd", "dvd", "dv" or "dv50" with optional prefixes "pal-", "ntsc-" or "film-")
-apad audio pad
-frames number set the number of frames to output
-filter filter_graph set stream filtergraph
-filter_script filename read stream filtergraph description from a file
-reinit_filter reinit filtergraph on input parameter changes
-discard discard
-disposition disposition
Video options:
-vframes number set the number of video frames to output
-r rate set frame rate (Hz value, fraction or abbreviation)
-s size set frame size (WxH or abbreviation)
-aspect aspect set aspect ratio (4:3, 16:9 or 1.3333, 1.7777)
-bits_per_raw_sample number set the number of bits per raw sample
-vn disable video
-vcodec codec force video codec ('copy' to copy stream)
-timecode hh:mm:ss[:;.]ff set initial TimeCode value.
-pass n select the pass number (1 to 3)
-vf filter_graph set video filters
-ab bitrate audio bitrate (please use -b:a)
-b bitrate video bitrate (please use -b:v)
-dn disable data
Audio options:
-aframes number set the number of audio frames to output
-aq quality set audio quality (codec-specific)
-ar rate set audio sampling rate (in Hz)
-ac channels set number of audio channels
-an disable audio
-acodec codec force audio codec ('copy' to copy stream)
-vol volume change audio volume (256=normal)
-af filter_graph set audio filters
Subtitle options:
-s size set frame size (WxH or abbreviation)
-sn disable subtitle
-scodec codec force subtitle codec ('copy' to copy stream)
-stag fourcc/tag force subtitle tag/fourcc
-fix_sub_duration fix subtitles duration
-canvas_size size set canvas size (WxH or abbreviation)
-spre preset set the subtitle options to the indicated preset
小結
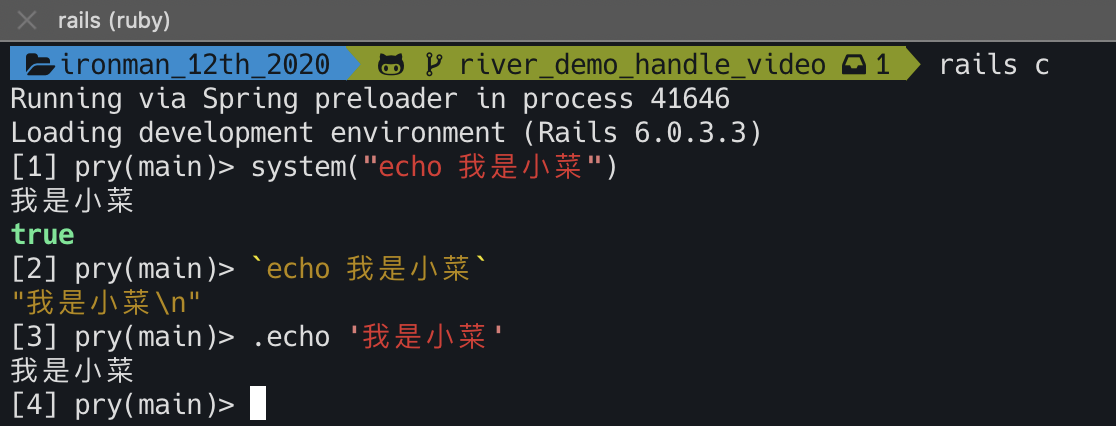
會發現影像處理,其實蠻有趣的,許多參數說明都是帶過,以實用為主,若對各參數細節調整有興趣,再自行 Google,FFmpeg 相關的文章挺多的,中文的資料也不少可參考,若想在 rails console 中執行 Linux 指令,可使用以下三種方法
1
2
3
4
5
6
7[1] pry(main)> system("echo 我是小菜")
我是小菜
true
[2] pry(main)> `echo 我是小菜`
"我是小菜\n"
[3] pry(main)> .echo '我是小菜'
我是小菜
鐵人賽文章連結:https://ithelp.ithome.com.tw/articles/10247454
medium 文章連結:https://link.medium.com/Z5b8hjxVdab
本文同步發布於 小菜的 Blog https://riverye.com/
備註:之後文章修改更新,以個人部落格為主